Creating Your First Theme
When you think you’re ready to try your hand at your first theme, the first step will be to assemble your tools. In addition to your normal arsenal of web development tools — typically a text editor and some form of image editor — you’ll need something that can edit Property Lists.
While it’s certainly possible to create Property Lists by hand using any ordinary text editor, it’s considerably easier to use Apple’s Property List Editor (or, as of Xcode 4, Xcode itself). If you’ve installed Apple’s developer tools, you already have it: find it in /Developer/Applications/Utilities (or just /Developer/Applications for Xcode). Otherwise, you can download the developer tools (aka, Xcode) from Apple’s Mac Dev Center (requires a free ADC account).
Creating Property Lists By Hand
Property Lists are simple XML files that use a key-value structure (that is, there are several named properties called “keys,” each with a value). The most basic Info.plist file is a Property List containing a dictionary (called a dict in Property Lists, commonly referred to as a map or associative array) and a series of keys and values. It looks something like this:
<?xml version="1.0" encoding="UTF-8"?>
<!DOCTYPE plist PUBLIC "-//Apple//DTD PLIST 1.0//EN" "http://www.apple.com/DTDs/PropertyList-1.0.dtd">
<plist version="1.0">
<dict>
    <key>BTMainFile</key>
    <string>index.html</string>
    <key>BTWindowWidth</key>
    <integer>220</integer>
</dict>
</plist>
Note that the general pattern is a key (represented by the key element) followed immediately by its value (represented by an element specific to the value’s type). Value elements you can use include:
<string>(an ordinary string of text)<integer>and<real>(numbers)<true/>and<false/>(boolean values, self-closing)<dict>and<array>(containers)
Currently, Bowtie only uses string, integer, real, and boolean (true/false) values. A full reference can be found online in Apple’s document, Property List Programming Guide: About Property Lists.
Important Note: In Property List Editor, numbers are given the “Number” type. However, in the actual XML files, numbers are either integers or real numbers (floating-point decimal numbers). Throughout the documentation, the appropriate type (Number/integer or Number/real) is specified for each key.
Creating the Theme Package
Once you’ve assembled all of your tools, you’ll start in on the creation of your actual theme by creating your theme’s package.
Create a folder for your theme. The folder should share your theme’s name, and end with the extension “.bowtie” (for example, the “Magic Theme” theme would be named “Magic Theme.bowtie”). It should be noted that it isn’t necessary that your theme’s name and the filename be the same: the filename has no significance to Bowtie whatsoever. However, to minimize confusion, the only instance in which the names should be different is when your theme’s name contains illegal filename characters (like slashes or colons).
If you have Bowtie installed, this folder will automatically become a package, and start acting as a single file. To gain access to the files you’ll be placing inside, right-click the theme file and choose “Show Package Contents.” Alternatively, you can just remove the “.bowtie” extension until you’re ready to test your theme.
Setting Up Your Info.plist File
The first file into your theme package should be your Info.plist file. This file contains all of your theme’s metadata, including its name, artist (that’s you!), version, unique identifier, and a handful of other configuration options.
There are a number of properties that you are required to set. These are:
BTThemeName: The name of your theme, as displayed to the user (ie, “Magic Theme”).BTThemeArtist: The artist of the theme. Just put your name here unless you have something else creative to display (ie, “{13bold}”).BTArtistURL: The URL to the artist’s website (ie, “http://13bold.com”).BTThemeIdentifier: A unique identifier for your theme, in reverse domain format (ie, “com.13bold.MagicTheme”).BTThemeVersion: The current version of your theme (ie, “1.0”).BTMainFile: Your theme’s main HTML file (ie, “magic.html”).BTThemePreviewImage: A “preview” image to display in the theme browser (ie, “preview.png”). For Mac, this should be 450 x 300; for Bowtie Touch, this should be a native resolution (320x480 or 640x960 for iPhone/iPod, 1024x768 for iPad) in either orientation.BTWindowWidthandBTWindowHeight: The dimensions of your theme’s transparent window; as small as possible to fully contain your theme without clipping it. These properties are not required for Bowtie Touch.
Once you’ve entered all of the required keys, your Info.plist file should look something like this (in Property List Editor):
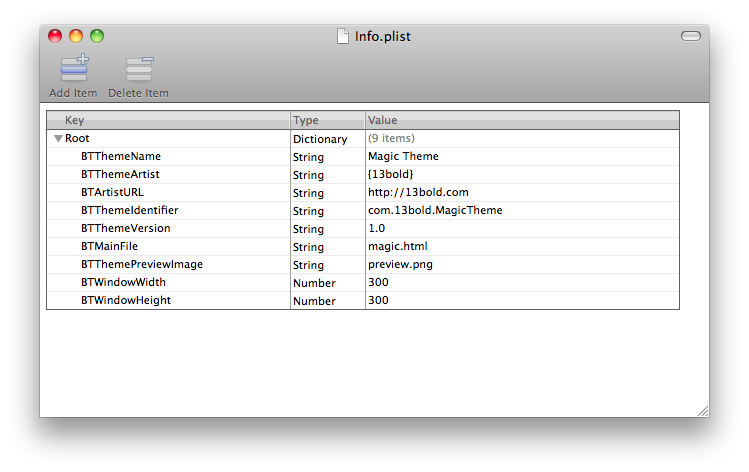
You can read the full description and usage details of each property in the Info.plist Key Reference.
You’ll likely add more keys to your Info.plist file as you develop your theme.
Creating Platform-Specific Themes
As of Bowtie 1.4 and Bowtie Touch 2.0, there are three possible theme platforms you can target: Mac, iPhone/iPod touch, and iPad. You can specify what device your theme is designed for using the BTThemeDevice key. If omitted, mac will be assumed.
Writing Your Theme
The body of your theme will be contained within a single HTML file. Create an HTML file to represent your theme (“index.html,” or something more specific to your theme; the name isn’t important), add it to your theme package (move it into your theme’s folder), and enter its name into your Info.plist file as the value for BTMainFile. Be sure to include the “.html” extension when specifying the file in Info.plist.
You are free to develop and design the interface for your theme however you’d like — you have full access to all the goodness Safari can dish out. You can use any number of image, CSS, and JavaScript files, just make sure you remember to copy them all into your theme’s package. While you’re designing your theme’s UI, you can preview your theme periodically in Safari: Safari and Bowtie will render your theme identically (with the exception that Bowtie will display your theme on a transparent background, not white).
When you’re ready to start adding interaction with Bowtie to your theme, you should first decide what kind of interaction you’d like to enable. Bowtie has two predominate interaction models, which can be mixed without problems: events and polling.
Using Events
Bowtie’s event model works a lot like push notifications on the iPhone: when something changes, Bowtie reaches out to your theme and calls one of its JavaScript functions. Bowtie is capable of notifying you when the current track changes, when the artwork changes (usually simultaneous with track changes), and when the playback state (playing/paused/stopped) changes.
The full list of events and their documentation is available in the Event Function Reference. Pretty much every theme, however, will implement four: Theme Ready, Track Changed, Artwork Changed, and Playback State Changed.
To implement (for instance), the “Track Changed” event, write a function to handle track changes, and put its name (in our example, “trackChanged”) in Info.plist as your BTTrackFunction.
The Track Changed event handler takes a single parameter (a BTWrapper object with information about the current track):
function trackChanged(theTrack)
{
    // ... important stuff goes here ...
}
Within that function, you would then use the properties of the track to update your theme. For example:
function trackChanged(theTrack)
{
    // assuming $(el) is defined as document.getElementById(el),
    // like with Prototype and several other libraries

    var trackTitle = theTrack.title || "Nothing Playing";
    var trackArtist = theTrack.artist || "";
    var trackAlbum = theTrack.album || "";

    $('titleElement').innerHTML = trackTitle;
    $('artistElement').innerHTML = trackArtist;
    $('albumElement').innerHTML = trackAlbum;
}
Note: the above code uses a syntax for accessing properties only available since Bowtie 1.1. For more information, see Accessing Properties in a
BTWrapper. For a list of available properties, seePlayer.currentTrack()in the Player (iTunes) Object Reference.
Note carefully the use of the OR operator (“||”) to check for undefined values. If you don’t do this (or something like it), you’ll probably see the word “undefined” pop up in your theme wherever a value isn’t set. This should be avoided at all costs.
The last step is to tell Bowtie that you want to use the “Track Changed” event. For this, we’ll put the name of our function (“trackChanged,” without parentheses or the parameter name) in our Info.plist file under BTTrackFunction. Now, whenever the track changes, Bowtie will call your trackChanged function with the new track as the parameter.
Every theme should take advantage of events, as it eliminates the lag that sometimes occurs with polling. For the majority of themes, Bowtie’s events provide all of the update information you’ll need, and you won’t need to use polling.
Information on adding support for the other events can be found in the Event Function Reference; the process is more or less the same, the functions just take different parameters.
Using Polling
Polling works a lot like email on your desktop Mac: your favorite mail client checks for new mail every so often on a schedule, and then performs a series of steps when it arrives to process it. In Bowtie, you use polling to check for changes not supported by the event model (for instance, when the player position — how many seconds into a song we are — changes, or to check for changes to the volume or rating).
Adding support for polling is very similar to adding support for an event — in fact, Bowtie internally treats a polling cycle as a “Status Update” event (see the Event Function Reference for more information). First, create a function for polling (with no parameters):
function pollingUpdate()
{
    // ... important stuff goes here ...
}
Then, add its name (here, “pollingUpdate”) to your Info.plist file as the value for the BTStatusFunction key. Bowtie will now call this function every second (currently; the interval may be changed in future versions).
So what do you do inside this polling function? Basically, anything you want. For instance, if your theme displays some kind of progress bar for the current track, you might use this to update it. Below is a more complex example that uses a “Track Changed” event handler function (described above) in combination with a polling function to update this kind of a progress bar. Assume that, in the Info.plist, BTTrackFunction is set to “trackChanged” and BTStatusFunction is set to “pollingUpdate.”
// A global variable for the track length
var currentTrackLength = 0.0;

function trackChanged(theTrack)
{
    // ... handle normal track change stuff, then ...
    currentTrackLength = theTrack.length || 0.0;
}

function pollingUpdate()
{
    var currentPosition = Player.playerPosition();
    var positionPercentage = (currentPosition / currentTrackLength) * 100.0;
    $('progressBar').style.width = positionPercentage + '%';
}
You can use any of Bowtie’s objects and methods from within the polling function. For more information, see the Player (iTunes) Object Reference and the Bowtie Object Reference.
Controlling the Music Player
Once you’ve got Bowtie communicating with your theme, it’s time to get your theme communicating with Bowtie. Bowtie exposes three objects — Player, Bowtie, and Lastfm — to allow your theme to control various playback features.
The
Playerobject is also available asiTunesfor compatibility, but because Bowtie is capable of controlling more than just iTunes, thePlayerobject is more semantically correct. If you don’t need your themes to run on Bowtie releases prior to 1.0 (eg, beta releases), usePlayer; otherwise, useiTunes.
You can call methods of these objects from anywhere in your theme, either wrapped in your own functions, or directly from buttons and links. Below are three examples of ways to create a “play/pause” button.
### EXAMPLE 1: Direct onClick/onTouchEnd Handlers ###
<a href="#" onclick="Player.playPause();return false;">Play/Pause</a>
<div onclick="Player.playPause();">Play/Pause</div> (Bowtie for Mac)
<div ontouchend="Player.playPause();">Play/Pause</div> (Bowtie Touch)

### EXAMPLE 2: Direct javascript: Link ###
<a href="javascript:Player.playPause();">Play/Pause</a>

### EXAMPLE 3: Wrapped onClick Handler ###
// in your HTML
<a href="#" onclick="return playPause();">Play/Pause</a>

// in your JavaScript
function playPause()
{
    // send the play/pause command
    Player.playPause();

    // do other stuff...
    // for instance, swap out a play/pause graphic rather
    // than wait for the "Playback State Changed" event

    // return false so the link isn't followed
    return false;
}
General web development practice discourages the use of “javascript:” links in favor of onClick handlers, but both will work in Safari.
For more information about what exactly you can control (and there’s a lot! — playback features, Last.fm loving/banning, theme-specific preferences), see the Player (iTunes) Object Reference, the Bowtie Object Reference, and the Lastfm Object Reference.
Finishing Up
Before your theme is ready to ship out the door, you’ll probably want to take care of a few things to polish it off: resizing your theme’s window, and creating a preview image.
Properly Sizing Your Theme’s Window
This section applies only to Bowtie for Mac. If you're developing a Bowtie Touch theme, skip to the next section.
When Bowtie displays your theme, it uses a transparent window containing a WebKit view. Ideally, the window should be just large enough to hold your entire theme without clipping it (including any transitions), but no larger.
If your window is too small, your theme will be visually clipped. This will be easy enough to see, and you can adjust as necessary.
If your window is too large, your theme will suffer from two problems:
- Taking a window-only screenshot of your theme (Command + Shift + 4, then spacebar) will result in a lot of empty space around your theme; and more importantly…
- Your theme’s entire window is draggable and clickable, which for always-on-top themes, can result in accidentally interacting with the Bowlet when trying to access an application underneath the transparent part of the window
To examine just how large your window should be, try setting your theme’s background color (via CSS) to white (or blue, or fuchsia) and run it in Bowtie. Then, use a screen ruler (or just some clever eyeballing) to determine how much excess there is, and modify the BTWindowWidth and BTWindowHeight keys in your Info.plist accordingly.
If you’d like to use a screen ruler, you might check out Free Ruler (free) or xScope ($27, but considerably more powerful).
Creating a Preview Image
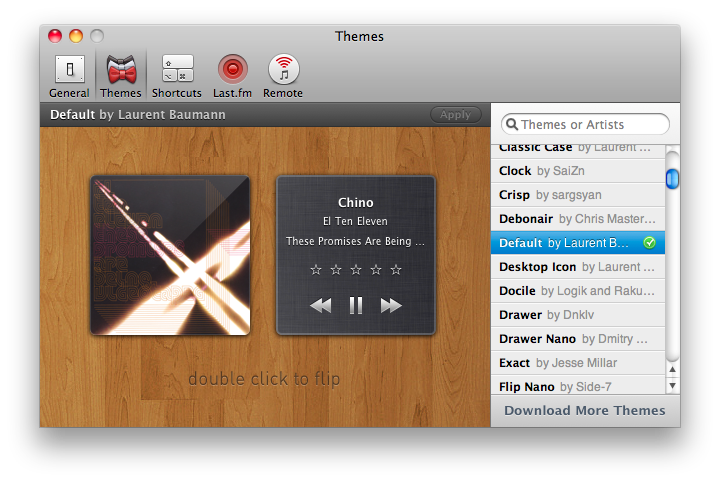
When a user chooses your theme in the Theme Browser in Bowtie, Bowtie will display the theme’s preview image in a pane next to the selector. Your preview image will also be used when your theme is previewed in the Finder with Quick Look.
Bowtie for Mac
To make a simple preview image, just fire up your theme in Bowtie and clear your screen of all windows and icons (perhaps using something like DeskShade). Then, pick your favorite wallpaper, and play an album with some awesome album art, and take a fullscreen screenshot (Command + Shift + 3). Then, open it in an image editor like Photoshop — even Preview will do with steady hands — and crop the image to 450 x 300.
Bowtie Touch
Making a preview image for Bowtie Touch themes is even easier: typically, they're just screenshots. With your theme running in Bowtie Touch, simultaneously press the Sleep/Wake and Home buttons on your iPhone/iPod touch or iPad to take a screenshot. The screenshot will be saved to your camera roll, which will appear in iPhoto next time you sync (or else, you can simply email it to yourself).
Tying it Together
Finally, you’ll need to include the image in your theme package, and enter its filename into your Info.plist file as the BTThemePreviewImage.
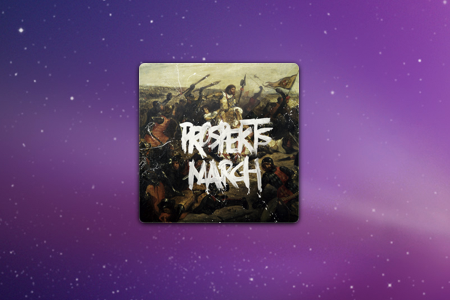
If you’d like to be a bit more creative, however, there is a general trend in the Bowtie theming community that encourages more elaborate, artistic theme preview images than simple screenshots. For example:

This gives you an opportunity to promote a brand, provide instructions, or else show off multiple views of your theme. {13bold} has no official position on the matter, but it’s a generally widely-accepted practice. If you have the time, energy, and ambition, by all means, spice up that preview image!
Testing and Installing Your Theme
On a Mac, when your theme is ready to test, you have two options for installing it. The easiest way is to use Bowtie’s own installation mechanism: just double-click your theme. Bowtie will automatically store it in the appropriate location, and load it into the app.
Alternatively, you can move the theme into place yourself, and then restart Bowtie. This is useful if you plan on making a lot of changes to your theme in a short period of time, because it allows you to edit your theme in-place, and then simply restart Bowtie.
You should install your theme in the “Bowtie” folder in the user’s Application Support directory: ~/Library/Application Support/Bowtie (the Library directory here referring to the one in your home directory). Never install themes inside the Bowtie application itself (inside Bowtie.app/Contents/Themes): they will be overwritten the next time Bowtie is updated, and invalidate Bowtie's code signature, disabling Last.fm scrobbling and causing problems with the OS X Firewall. The internal Themes directory is only for Bowtie’s included themes.
Testing on Bowtie Touch
Testing on Bowtie Touch is a little bit trickier than testing on a Mac. TBD.